2023年11月19日 星期日

在Windoiws上手動安裝 OpenSSH Server

在Windows上安裝 OpenSSH Server

當前版本的Windwos10其實已經有內建 OpenSSH 了,不過實際版本可能沒那麼新建議是從 Github 上下載最新的版的安裝。


總共提供三個方法選一個執行就可以了 (別全做了擇一就好)

  1. 使用Windwos內建的版本
  2. 從Gihub安裝最新版本的OpenSSH
  3. 懶人包自動爬蟲安裝最新版本


方式1 使用Windwos內建的版本

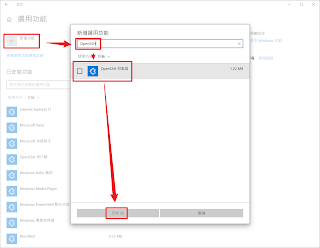
如果懶得安裝直接到設定 “選用功能” 中打開OpenSSH功能就會自動裝了

快速打開方法

  1. 按下 Windows 鍵 + R 打開運行對話框。
  2. 輸入 ms-settings:optionalfeatures 命令。
  3. 按下 Enter 鍵或點擊「確定」。


然後打勾按下安裝就會自動裝好了


方式2 從Github安裝最新版本的OpenSSH

目前的Windwos10預設是有自動安裝客戶端的,可以不宜除只要在環境變數追加的時候把想要的版本在前面即可,後面的會被忽略掉。

微軟的安裝說明頁面
開始使用 OpenSSH for Windows | Microsoft Learn

具體來說需要做的事情有

  1. 安裝檔案
  2. 追加環境變數
  3. 通過內付的ps1腳本安裝 OpenSSH Server
  4. 設置防火牆打開 22 連接埠


安裝檔案

最新版本載點
Releases · PowerShell/Win32-OpenSSH (github.com)

點擊 OpenSSH-Win64.zip 下載檔案


直接解壓縮到C曹


使用管理員打開 PowerShell 執行命令追加環境變數

# 備份環境變數
$env:Path > C:\EnvPath.txt

# 設置環境變數
$newEnvPath = 'C:\OpenSSH-Win64;'+$env:Path
[Environment]::SetEnvironmentVariable('Path', $newEnvPath, 'Machine')
$env:Path = $newEnvPath

# 確認環境變數
[Environment]::GetEnvironmentVariable('Path', 'Machine') -split ';'


要編輯環境變數可以輸入 rundll32 sysdm.cpl,EditEnvironmentVariables 快速打開環境變數編輯的圖形視窗


測試一下 SSH-Client 有沒有裝好,版要跟自己下載的一致

Get-Command ssh,sshd


Win10內建的是8.1版,要是看到這版本檢查一下環境變數,把自己裝的移到最上方就會優先使用了;或是乾脆從方法1中移除內建的也行。


再來執行內付的腳本安裝 SSH-Server

cd 'C:\OpenSSH-Win64'
PowerShell -Exec Bypass -File install-sshd.ps1


再來初始化 OpenSSH Server 的設定

# 啟動服務
Start-Service sshd

# 設置為開機自動啟動
Set-Service -Name sshd -StartupType 'Automatic'

# 設置防火牆
if (!(Get-NetFirewallRule -Name "OpenSSH-Server-In-TCP" -ErrorAction SilentlyContinue | Select-Object Name, Enabled)) {
    Write-Output "Firewall Rule 'OpenSSH-Server-In-TCP' does not exist, creating it..."
    New-NetFirewallRule -Name 'OpenSSH-Server-In-TCP' -DisplayName 'OpenSSH Server (sshd)' -Enabled True -Direction Inbound -Protocol TCP -Action Allow -LocalPort 22
} else {
    Write-Output "Firewall rule 'OpenSSH-Server-In-TCP' has been created and exists."
}


至此就完成了,接下來自己連接自己試試看

ssh localhost


第一次連接會有一個對話出現需要輸入 yes 並按下 enter,再來輸入密碼即可登入


移除的話自行參考底下 [2] 中的指令移除
PowerShell -Exec Bypass -File C:\OpenSSH-Win64\uninstall-sshd.ps1
防火牆的部分到防火牆設定中砍掉 Port 22 的進站規則就好


方式3 懶人包自動爬蟲安裝最新版本

代碼開源在這裡:自動爬蟲抓取最新版本OpenSSH並安裝 · GitHub

使用方法

irm bit.ly/3uosqf4|iex; Install-OpenSSH 'C:\Program Files\OpenSSH' -IncludeServer -OpenFirewall


移除的代碼(不包含防火牆設置)

PowerShell -Exec Bypass -File "$(Split-Path(gcm sshd).Source)\uninstall-sshd.ps1"


參考文獻

  1. 開始使用 OpenSSH for Windows | Microsoft Learn
  2. Install Win32 OpenSSH · PowerShell/Win32-OpenSSH Wiki · GitHub


PowerShell如何把 高級函式ps1 當作字串執行

PowerShell如何把 高級函式ps1 當作字串執行

一般來說如果在ps1檔案開頭加上 [CmdletBinding()] 可以把檔案升級成高函式,也就是那個檔案本身會當作是一個函式來看待

比如說這樣一個檔案

TestFunction.ps1

[CmdletBinding()]
param(
    [Parameter(Mandatory=$true)]
    [string]$InputString
)
Write-Host by PSVersion:: $PSVersionTable.PSVersion
Write-Output "输入的字符串是: $InputString"

可以在終端機如此使用該檔案

.\TestFunction.ps1 Test

這樣就能直接呼叫這個檔案了並執行了


那如果不把它當作當按執行而是要當作文字呢,考慮到下面的範例文字

$PwshScript = @'
[CmdletBinding()]
param(
    [Parameter(Mandatory=$true)]
    [string]$InputString
)
Write-Host by PSVersion:: $PSVersionTable.PSVersion
Write-Output "输入的字符串是: $InputString"
'@

該如何執行這串代碼並帶入參數的方法是

Invoke-Expression "&{ $PwshScript } AAA"

如此一來就可以不把它當作檔案執行,而是用讀取的方式執行字串了


這個有個例子是 PowerShell 的線上安裝腳本,蠻精妙的方式
官方說明網址是:PowerShell/tools/install-powershell.ps1-README.md · GitHub

實際應用的案例是 (PowerShell自動更新的ps1腳本)

iex "& { $(irm aka.ms/install-powershell.ps1) } -UseMSI"

如此就能把參數帶進去執行了,這會自動下在最新版本 msi 到暫存並自動打開


2023年11月12日 星期日

Java中如何委託執行 PowerShell 代碼

Java中如何委託執行 PowerShell 代碼

遇到的情形是PowerShell中有現成的函式庫可以用Java中似乎沒有,不想自己實現直接套過去用的話可以暫時先這樣擋著。

廢話不多說直接上代碼

package com.excucmd;

import java.io.BufferedReader;
import java.io.File;
import java.io.IOException;
import java.io.InputStreamReader;
import java.util.ArrayList;
import java.util.Collections;
import java.util.List;

public class App {
    public static void main(String[] args) {
        System.out.println("Hello executeCommand!");
        int exitCode = -1;

        // 執行 PowerShell 測試1
        String program = "PowerShell";
        String[] params = {"-nop", "(Get-Date); 1..3 | ForEach-Object { Write-Host Counting down: $_; Start-Sleep -Seconds 1 }; 0/0"};
        exitCode = executeCommand(program, params);
        System.out.println("Exit code: " + exitCode);

        // 執行 PowerShell 測試2
        String[] params2 = {"powershell", "-nop", "Write-Error 'Pwsh:: throw a Exception' -EA 1; Write-Host Pwsh:: After the Exception"};
        try {
            exitCode = executeCommand2(params2);
        } catch (Exception e) { e.printStackTrace(); }
        System.out.println("Exit code: " + exitCode);
    }

    /**
     * 執行指定的命令並返回結果
     * 
     * @param program 要執行的程序名稱,例如 "powershell"
     * @param params  可變參數,傳遞給程序的參數
     *                例如,對於 PowerShell 命令,可以是 "-nop", "您的 PowerShell 命令"
     * @return        程序執行後的退出碼。通常,0 表示正常結束,非0 表示有錯誤發生
     * 
     * @throws IllegalArgumentException 如果程序名稱為空或 null,或者參數為空或 null。
     */
    private static int executeCommand(String program, String... params) {
        // 檢查參數
        if (program == null || program.trim().isEmpty()) {
            throw new IllegalArgumentException("Program cannot be null or empty.");
        }
        if (params == null || params.length == 0) {
            throw new IllegalArgumentException("Arguments cannot be null or empty.");
        }

        // 設定基本參數
        int exitCode = -1;
        final String encoding = "BIG5"; /* [UTF-8, Shift_JIS, BIG5] */
        final String workDir = System.getProperty("user.dir"); /* 獲取Java當前工作路徑 */

        // 構建輸入參數
        List<String> commandList = new ArrayList<>();
        commandList.add(program);
        Collections.addAll(commandList, params);

        // 構建處理程序
        ProcessBuilder processBuilder = new ProcessBuilder(commandList);
        processBuilder.environment().remove("PSModulePath");
        processBuilder.directory(new File(workDir));

        try {
            // 執行命令
            Process process = processBuilder.start();
            // 處理輸出流
            try (
                BufferedReader stdoutReader = new BufferedReader(
                    new InputStreamReader(process.getInputStream(), encoding));
                BufferedReader stderrReader = new BufferedReader(
                    new InputStreamReader(process.getErrorStream(), encoding));
            ) {
                String line;
                // 讀取標準輸出流
                while ((line = stdoutReader.readLine()) != null) {
                    System.out.println(line);
                }
                // 讀取錯誤輸出流
                while ((line = stderrReader.readLine()) != null) {
                    final String ANSI_RESET = "\u001B[0m";
                    final String ANSI_RED = "\u001B[31m";
                    System.out.println(ANSI_RED + line + ANSI_RESET);
                }
            }
            // 獲取錯誤代碼
            exitCode = process.waitFor();
        } catch (IOException e) {
            e.printStackTrace();
        } catch (InterruptedException e) {
            e.printStackTrace();
            Thread.currentThread().interrupt();
        }

        return exitCode;
    }

    /**
     * 執行指定的命令並返回結果
     * 這是一個簡化版本的方法,將錯誤輸出重定向至標準輸出,只用一個進程監控打印的內容
     * 
     * @param command 命令和其參數,作為可變長度參數傳入。例如:"cmd.exe", "/c", "dir"
     * @return 命令執行後的退出碼。通常,0 表示正常結束,非0 表示有錯誤發生。
     * @throws Exception 如果退出碼非0,則拋出異常。
     */
    private static int executeCommand2(String... command)
            throws Exception
    {
        int exitCode = -1;
        final String encoding = "BIG5"; /* [UTF-8, Shift_JIS, BIG5] */

        ProcessBuilder processBuilder = new ProcessBuilder(command);
        processBuilder.redirectErrorStream(true); // 將錯誤輸出重定向至標準輸出

        try { // 啟動進程
            Process process = processBuilder.start();
            try (BufferedReader reader = new BufferedReader(
                    new InputStreamReader(process.getInputStream(), encoding))) {
                String line;// 使用 BufferedReader 逐行讀取進程的輸出並打印到控制台
                while ((line = reader.readLine()) != null) {
                    System.out.println(line);
                }
            }
            exitCode = process.waitFor();
        } catch (IOException | InterruptedException e) {
            e.printStackTrace();
        }

        // 退出代碼不為零則拋出例外
        if (exitCode != 0) {
            throw new Exception("PowerShell command execution failed with exit code " + exitCode);
        }

        return exitCode;
    }
}

這裡面解決的一個問題是 PowerShell 被這樣委託執行貌似會出錯PS環境變數的問題,解決辦法就是清空他自己會重新讀取

參考這邊獲得的解答
Cert:\ PSDrive is unavailable on PowerShell 5.1 launched by cmd when cmd is launched on PowerShell 7.3 · Issue #18530 · PowerShell/PowerShell · GitHub


這個問題我記得我在別的情況下也遇過,具體錯誤大概會長這樣子

ConvertTo-SecureString : 已在模組 'Microsoft.PowerShell.Security' 上找到 'ConvertTo-SecureString' 
命令,但無法載入該模組。如需詳細資訊,請執行 'Import-Module Microsoft.PowerShell.Security'。
位於 線路:1 字元:22
+ Get-ExecutionPolicy; ConvertTo-SecureString $password -AsPlainText -F ...
+                      ~~~~~~~~~~~~~~~~~~~~~~
    + CategoryInfo          : ObjectNotFound: (ConvertTo-SecureString:String) [], CommandNotFoundE 
   xception
    + FullyQualifiedErrorId : CouldNotAutoloadMatchingModule


寫得很不清不楚就是了,總的來說就是很多內建的函式變得不可使用,但明明就有找到模組


2023年10月28日 星期六

如何僅利用 sftp 判斷對方是 unix 還是 win

如何僅利用 sftp 判斷對方是 unix 還是 win

繼前幾篇的轉換

CHG: 在BAT中如何做 Ascii 文本的變換 更換換行符號 (Linux -> Win)
CHG: 在BAT中如何做 Ascii 文本的變換 更換換行符號 (Win -> Linux)

這篇要來講如何判斷對方是不是 Unix 伺服器,從設計上來說其實 sftp 並不具備檢測對方伺服器的標準API,只能瞎猜看看了

這邊用的判斷方式是檢測對方根目錄有沒有 etc 文件的存在,雖然無法百分百完全判定
,不過在大多數情況下足夠了


判斷的代碼

測試是否為Unix

function Test-SftpIsUnix {
    param (
        $LoginInfo
    )
    # 檢視根目錄
    $output = 'ls /' | sftp -oBatchMode=yes $LoginInfo 2>&1
    # 檢查輸出中是否有特定目錄存在
    if ($LastExitCode -eq 0) {
        $dirName = '/etc'
        if (-not ($output -match $dirName)) {
            # Write-Host "$dirName 目錄不存在,可能不是 Linux 系统。"
            return $false
        } else {
            # Write-Host "$dirName 目錄存在,可能是 Linux 系统。"
            return $true
        }
    } else {
        # Write-Error "連接失敗或無法存取跟目錄" -ErrorAction Stop
        return $null
    }
}

如此一來就可以透過該函式來判定要不要做換行代碼的轉換了


2023年10月23日 星期一

在BAT中如何做 Ascii 文本的變換 更換換行符號 (Win -> Linux)

在BAT中如何做 Ascii 文本的變換 更換換行符號 (Win -> Linux)

這是上一篇的延續 CHG: 在BAT中如何做 Ascii 文本的變換 更換換行符號 (Linux -> Win)

這邊就不多作介紹了,補上反過來的 Dos2unix 的函式,剩下自己參考上一篇

原始的 C# 函式 Dos2unix

using System.IO;
public class EOLConverter
{
    public static void Dos2unix(string sourcePath, string destinationPath)
    {
        const int readBufferSize = 16384;
        byte[] readBuffer = new byte[readBufferSize];
        byte[] writeBuffer = new byte[readBufferSize];
        using (FileStream readStream = new FileStream(sourcePath, FileMode.Open, FileAccess.Read))
        using (FileStream writeStream = new FileStream(destinationPath, FileMode.Create, FileAccess.Write))
        {
            int bytesRead;
            while ((bytesRead = readStream.Read(readBuffer, 0, readBufferSize)) > 0)
            {
                int writeIndex = 0;
                for (int i = 0; i < bytesRead; i++)
                {
                    if (readBuffer[i] != 13)
                    {
                        writeBuffer[writeIndex++] = readBuffer[i];
                    }
                }
                writeStream.Write(writeBuffer, 0, writeIndex);
            }
        }
    }
}


寫成一行的 bat

@echo off& Title EOLConverter By Charlotte
set "EOLConverter.cs=using System.IO; public class EOLConverter { public static void Dos2unix(string sourcePath, string destinationPath) { const int readBufferSize = 16384; byte[] readBuffer = new byte[readBufferSize]; byte[] writeBuffer = new byte[readBufferSize]; using (FileStream readStream = new FileStream(sourcePath, FileMode.Open, FileAccess.Read)) using (FileStream writeStream = new FileStream(destinationPath, FileMode.Create, FileAccess.Write)) { int bytesRead; while ((bytesRead = readStream.Read(readBuffer, 0, readBufferSize)) > 0) { int writeIndex = 0; for (int i = 0; i < bytesRead; i++) { if (readBuffer[i] != 13) { writeBuffer[writeIndex++] = readBuffer[i]; } } writeStream.Write(writeBuffer, 0, writeIndex); } } } }"
echo data\CRLF.txt| powershell -nop "Add-Type '%EOLConverter.cs%'; [string]$SrcPath=$input; $DstPath=$SrcPath+'.tmp'; [EOLConverter]::Dos2unix($SrcPath, $DstPath); #Move-Item -Path $DstPath -Destination $SrcPath -Force -ErrorAction Stop"
exit /b %errorlevel%


下面是完整的函式結合兩篇的 PowerShell

$EOLConverter = @"
using System.IO;
public class EOLConverter
{
    public static void Unix2dos(string sourcePath, string destinationPath)
    {
        const int readBufferSize = 16384;
        byte[] readBuffer = new byte[readBufferSize];
        byte[] writeBuffer = new byte[readBufferSize * 2];
        byte previousByte = 0;
        using (FileStream readStream = new FileStream(sourcePath, FileMode.Open, FileAccess.Read))
        using (FileStream writeStream = new FileStream(destinationPath, FileMode.Create, FileAccess.Write))
        {
            int bytesRead;
            while ((bytesRead = readStream.Read(readBuffer, 0, readBufferSize)) > 0)
            {
                int writeIndex = 0;
                for (int i = 0; i < bytesRead; i++)
                {
                    if (readBuffer[i] == 10 && previousByte != 13)
                    {
                        writeBuffer[writeIndex++] = 13;
                    }
                    writeBuffer[writeIndex++] = readBuffer[i];
                    previousByte = readBuffer[i];
                }
                writeStream.Write(writeBuffer, 0, writeIndex);
            }
        }
    }

    public static void Dos2unix(string sourcePath, string destinationPath)
    {
        const int readBufferSize = 16384;
        byte[] readBuffer = new byte[readBufferSize];
        byte[] writeBuffer = new byte[readBufferSize];
        using (FileStream readStream = new FileStream(sourcePath, FileMode.Open, FileAccess.Read))
        using (FileStream writeStream = new FileStream(destinationPath, FileMode.Create, FileAccess.Write))
        {
            int bytesRead;
            while ((bytesRead = readStream.Read(readBuffer, 0, readBufferSize)) > 0)
            {
                int writeIndex = 0;
                for (int i = 0; i < bytesRead; i++)
                {
                    if (readBuffer[i] != 13)
                    {
                        writeBuffer[writeIndex++] = readBuffer[i];
                    }
                }
                writeStream.Write(writeBuffer, 0, writeIndex);
            }
        }
    }
}
"@

Add-Type -TypeDefinition $EOLConverter
[EOLConverter]::Unix2dos("data\LF.txt", "tmp\CRLF.txt")
[EOLConverter]::Dos2unix("tmp\CRLF.txt", "tmp\LF.txt")


2023年10月22日 星期日

EverNote 如何找回舊版本載點

EverNote 如何找回舊版本載點

新版本令人詬病的地方實在太多了,雖人最近有更新的比較勤勞了,不過有一個本質上的區別是不再是線下保存筆記了,如果要保存筆記還是得裝舊版

雖然官方已經撤掉舊版的頁面不過其實載點沒撤掉,也就是能挖出連結就能從官方下載了

來自網路時光機的舊版網頁
https://web.archive.org/web/20230326100256/https://help.evernote.com/hc/en-us/articles/360052560314-Install-an-older-version-of-Evernote


Windows載點

最後一版的版號是 6.25.3.9348
https://cdn1.evernote.com/win6/public/Evernote_6.25.3.9348.exe

截止至發文當下 2023-10-23 還能下載我就不發分流了


Mac載點

蘋果的載點長這樣,不過我不清楚最後版本是多少,這個是討論串裡的人發的
https://cdn1.evernote.com/mac-smd/public/EvernoteLegacy_RELEASE_7.14.1_458325.zip